

How To Install A Countertop Between Two Walls
How to Install a Countertop
Updated: Sep. 06, 2022
Step-by-stride instructions on how to install a pre-made plastic laminate countertop in your kitchen or bathroom.

We'll show you five techniques for a great looking countertop installation. Buy the countertops premade, then install them yourself by post-obit our foolproof step-by-step instructions. We'll walk you through everything you need to know to improve the await and feel of your kitchen with new countertops.
You lot might likewise like: TBD
- Time
- Complication
- Cost
- A full day
- Intermediate
- Varies
Prefab laminate countertops
Plastic laminate countertops
You'll save a lot of money installing prefab laminate countertops yourself.
Plastic laminate countertops accept been adorning kitchen cabinets for more than 50 years—and with good reason. Plastic laminate is a tough, durable material that comes in hundreds of colors and finishes. When practical to particleboard or plywood underlayment by a production shop, this proven product is ideal for kitchens, bathrooms and other settings. By installing premade countertops yourself, you'll save 50 percent of what a professional installer would accuse.
In this article, we'll show you lot how to measure, purchase and install your own countertops. Our instructions include how to make fleck-free cuts, tight-to-the-wall scribes and most invisible joints for a professional looking job.
The easiest approach is to order custom-made laminate countertops (ours cost about $30 per running foot) from a local dwelling house center, total-service lumberyard or cabinet/countertop store. You can besides buy premade take-it-with-you lot stock tops (in limited colors) at many home centers, for about half the price of custom countertops. Shop for the latest in plastic laminates on manufacturer Web sites.
You can also view product samples at home centers and countertop suppliers.
3 special tools brand all the difference
- A belt sander with an 80-grit belt is a must for removing material along the behind of the backsplash (Photo 7).
- You also need a scribing tool (Photograph 6) to make accurate marks forth irregular walls.
- A 10-in. mill file and a smaller one-half-round file will assistance y'all get perfect fits for end caps (Photo 12).
- Besides these special tools, a 10-point or finer handsaw, drill, jigsaw, masking tape and tape mensurate are all you need.
Measure carefully earlier y'all social club your new prefab laminate countertops
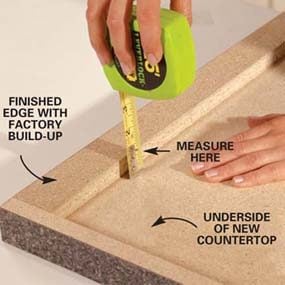
Photo 1: Measure forth the finished edge
Measure the hollow space nether your new countertop for the right build-upwards height. Your manufacturer can supply build-up strips or you tin cut them yourself. Our measurement was 3/4 in., and so we used 1x2s as build-upward strips.
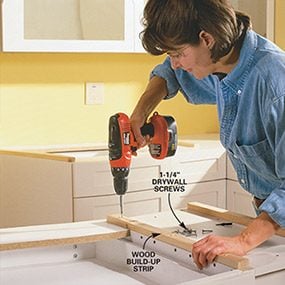
Photo ii: Attach the build-up strips
Screw the build-upwards strips to the tops of your cabinets (sides and along the back) using 1-one/4 in. drywall screws. Yous may not need them on the cabinet end where the manufacturer has installed a finished stop.
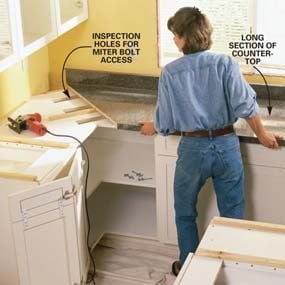
Photo 3: Test fit the counter corner pieces
Slide the counter corner pieces into position first to test fit for scribing. Since our corner chiffonier had a solid top, we cutting inspection holes to tighten the miter bolts (next photo).

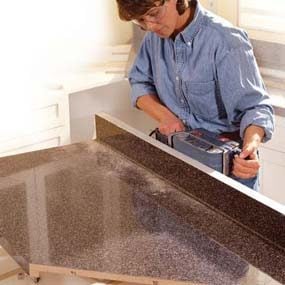
Photo iv: Concord the counter corners together
Temporarily commodities the two corner pieces together from below. Use the special miter bolts (in a higher place) that come with the countertop.

Detail of miter bolts
These special miter bolts temporarily concur the countertop corners together.
Earlier ordering new countertops, you'll need to make authentic measurements of your cabinet layout. A give-and-take of warning here: If you have a U-shaped kitchen with two big miters and take never installed countertops before, you may desire to hire a pro. Configurations like this require you to scribe three walls at ane time. Just if y'all have only one inside corner as we did, the project is well within the skill level of the average practice-it-yourselfer.
Make a sketch and and then, starting from the back walls, measure out the exact lengths from the walls to the edge of each run of cabinets. Add together 3/4 in. to the length of each section to allow for overhangs. Allow an actress inch to protrude into a freestanding range infinite. You lot'll trim it off later for an exact fit (Photo 11). Lodge a laminate end cap (or make your own, Photo 12). If you need to butt the countertop into a side panel like a pantry or refrigerator cabinet, add an extra 1 in. for notching (Photos 14 – sixteen). This volition give a more than finished wait than a direct cut. Also mensurate the depth of your base of operations cabinets. Standard laminate tops are 25 in. deep. Check to make sure y'all'll accept at least ane/2-in. overhang across all the drawer fronts.
Near manufacturers volition supply preshaped and preglued atomic number 26-on finish caps to embrace finished ends, only I adopt to order a lilliputian actress plastic laminate that I tin score and cutting and glue into identify with contact cement for a longer-lasting grip. Either system works fine, but if this is your first go at this type of projection, y'all'll find the iron on cease caps easier to install. Merely keep in mind you'll demand to exercise a scrap of filing in either example to shape the end caps. Another important consideration is corner and edge style. To fit our design requirements, we chose square corners for all our edges. If y'all want any rounded corners on exposed edges, discuss this with your supplier ahead of time and ask to see sample profiles.
You lot'll also need build-upwardly strips (ordinarily iii/iv in.) (Photo 2) to support the top across the cabinets. At beginning glance, countertops announced to exist 1-1/2 in. thick, only the substrate that the laminate is glued to is actually just 3/4 in. thick, equally the underside reveals. Applying boosted build-upwards strips to the top of your cabinets will fill the void at back up points and elevate the countertops in a higher place peak drawers. When ordering, inquire for build-up strips, merely keep in mind you tin hands brand your ain from scrap iii/4-in. plywood or 1×ii pine.
Once y'all complete your measurements, take your drawing to your countertop supplier and discuss your plan to make sure y'all've covered all the bases. If y'all don't have a home center near you or your lumberyard doesn't provide this service, bank check the internet for "Countertops." When yous place your order, ask about delivery to your dwelling house. In most cases, the odd shapes are unwieldy and won't balance securely on peak of the family unit car.
Measure at Least Twice to Locate the Sink
You can get into trouble hither if you don't call up through three important steps:
- Centre the sink over the sink base cabinet.
- Fix the sink back far enough to clear the cabinet front.
- Cut the hole smaller than your sink'southward rim.
For most stainless steel sinks, it's prophylactic to flip the sink over and trace effectually it and so make some other line 1/2 in. inside the trace line (Photo viii). The exception here is an asymmetrical shape where the left side is different from the right side. Check this advisedly, particularly if you're reinstalling your old sink and no longer accept the original template (about new sinks come with a full-size template). If you're installing a cast iron enameled sink, you should brand an even smaller cutout, leaving more than countertop to support the weight of the sink. Usually most cast fe sinks will allow you to cut inside the traced perimeter at to the lowest degree 1 in. Once you've traced the outline, draw another line within the showtime, drill your holes (Photo 9), then flip the countertop over, transfer the lines (Photo 10) and cut out the pinnacle.
Scribing your backsplash to the wall is the most crucial footstep
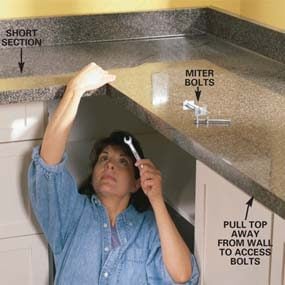
Photo five: Tighten the miter bolts
Brand certain the miter is flush on top as yous tighten the bolts. Once the bolts are tight and the peak is flush, slide the countertop into the corner and examine the fit along each wall.

Photograph half-dozen: Scribe the backsplash
Prepare your scribing tool to the width of the widest gap forth each wall. Apply masking record to the tiptop of the backsplash and use your scribe to mark the entire length of each countertop. Scribe to each wall, adjusting your scribing tool each fourth dimension for the largest gap on that wall.
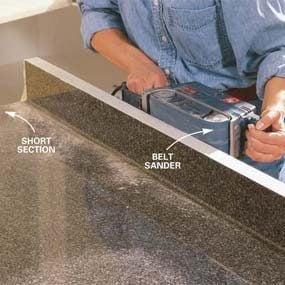
Photograph vii: Sand to the scribe line
Chugalug sand to your scribe line using an lxxx-grit belt. Brand sure the top is clamped downward to your piece of work surface to continue information technology from "walking" abroad from you equally yous sand. Sand only to your scribe line, keeping the belt sander at 90 degrees or more to the top of the backsplash as shown. Reposition the elevation and rescribe and sand if necessary.
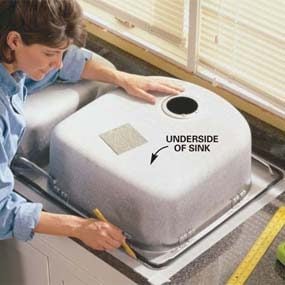
Photograph viii: Trace around the sink
Flip our sink upside down into position over the sink cabinet. If your sink is not symmetrical, use a template. Mark around the perimeter, then marking another line 1/2 in. inside the perimeter (1 in. for cast atomic number 26) yous've just marked. This will exist the cutout size.
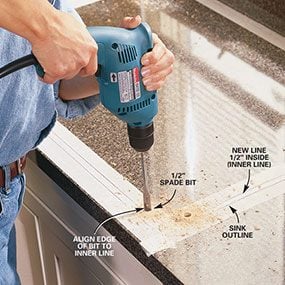
Photo nine: Drill holes inside the template
Drill 1/2-in. dia. holes about ii in. from each corner. The edges of the holes should just kiss the inside edge of the inner line.
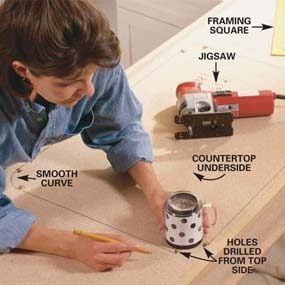
Photograph 10: Connect the drill holes
Flip the height upside down. Connect the dots. The lines should touch the outer circles of the ane/2-in. holes. Use a coffee mug to round the corners. Cut out the top from the lesser side with a jigsaw. Set the sink into the opening to check the fit.
You can showtime with any section of countertop, only information technology's best to begin with the longest corner section because the other sections often bring together or relate to this piece. Our long section had a number of fitting challenges—peculiarly the corner. To get an accurate scribe to the wall here, you need to temporarily join the corner (Photograph 5).
To do this, install the miter bolts as shown in Photo 5 and and so slide the top into the corner for a test fit. Before yous scribe, align the front edges of the countertop parallel to the cabinet fronts. Close gaps where the backsplash meets the wall if possible. Scribe the height as shown in Photo vi. Keep in mind you can remove up to 1/2 in. from the backside of the backsplash to fit your wall. This is more than than enough in most cases, so don't panic if your bordering wall looks out of whack.
Next, sand downward the back edge (Photograph vii) of the backsplash to your scribe line with a belt sander. Tip the belt sander slightly to undercut the backsplash for a tighter fit. Set the countertop back against the walls and bank check it for fit. It should fit on the offset try, but you may demand to do some additional sanding for a tight fit.
Next, remove the miter bolts and split up the sections so you can cut the sink opening (Photos eight – ten).
Tip: Be sure you lot have a build-up strip under the backsplash behind the sink and at each side of the sink base of operations chiffonier. The total weight of the sink needs continuous support.
Cut the Opening from the Bottom Side
Utilise a jigsaw with a medium-cut blade. The blade cuts on the upwardly stroke, and then do all your cuts from the bottom of the countertop to minimize chipping. Be sure the cutout is supported when you attain the end of your cut and then you don't break an border. After the hole is cutting, gear up the sink into the opening to bank check the fit. Practice a scrap of trimming if it binds as yous drop it in.
Utilise a handsaw to cut the countertop to length
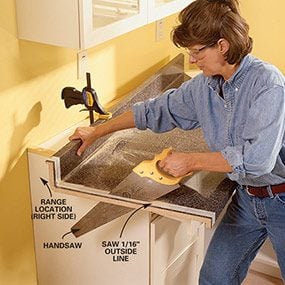
Photograph 11: Use a handsaw to cut the countertop
Trim the cease of the countertop with a precipitous 10-tooth-per-inch handsaw. Start apply masking record over the edge and so marking the cutoff line with a pencil. Cut 1/16 in. exterior the marking and so chugalug-sand to the line. Adjacent, glue (use carpenter'south gum) and clamp a buildup strip onto the underside of the top and flush with the edge.
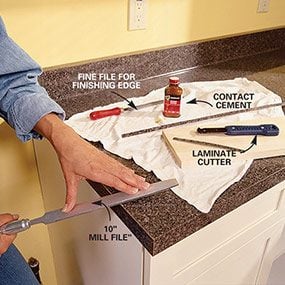
Photo 12: File the end cap
Cut and glue the end cap for your trimmed stop. Utilize a fine manufacturing plant file to fine-tune the end cap so it conforms to the shape of your countertop. Use a half-round file for inside curves.
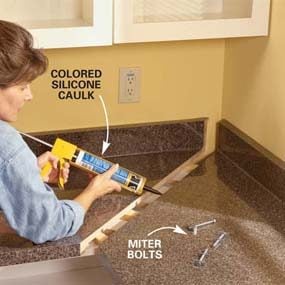
Photograph 13: Caulk the miter joint
Squeeze a dewdrop of siliconized acrylic agglutinative caulk onto the edge of each miter joint and so fasten the countertop sections together every bit before. Be sure the tops are flush equally you lot tighten the bolts.
Earlier we could assemble the miter joint, we had to cutting the short section of the countertop exactly flush with the cabinet end (Photo xi) to make room for the range. If yous're skilled with a round saw, yous tin make this cut from the underside with a 40-tooth carbide blade, merely information technology'due south risky. Ane faux movement and you've got some other workbench elevation! Why take chances? A sharp handsaw volition give you a nice, dull, controlled cut and time to react if the cut is straying from your marker. Employ a traditional saw that cuts as you push the blade away from you. Press masking record over the area yous plan to trim.
The masking record serves a dual purpose here: It lets you easily see your pencil marker and information technology reduces chipping of the laminate equally you cut. After the cut, utilize a belt sander to sand right to the line. Make certain you've made a square border. Adjacent, mucilage a build-up strip to the bottom flush with the newly cut edge and clamp it in place.
Once the mucilage is dry, you can apply matching plastic laminate over this congenital-up edge. If you don't have a precut finish cap, cut one from your extra slice of laminate. Brand a couple of practice cuts with a laminate cutter (Photo 12) before you try the real thing. Ready your laminate on scrap wood (not on your new countertop!) and draw the shape of the end cap plus 1/4 in. actress on both the meridian and front.
Score the tiptop several times to cutting through the laminate, using a straightedge as a guide. Exist conscientious almost the corner where the backsplash section leaves a right bending rise. It's easy to break this trivial clamper off.
Apply contact cement to each mating surface and allow it dry to the touch (nearly xx minutes). Then position the end cap even with the bottom border of the build-up filler strip and printing it firmly into identify.
Using a dry rag, firmly wipe the surface to farther press it for a good bail. Now file the end cap flush to the countertop (Photo 12). Accept your fourth dimension with slow, controlled strokes. When the edge is almost flush, slightly bevel the end cap to remove sharp corners that could snag a dishcloth later. Finally, push the sections back together, use caulk and join the miter (Photo 13). And then install the miter bolts using the method shown in Photos 4 and 5.
Cutting a render
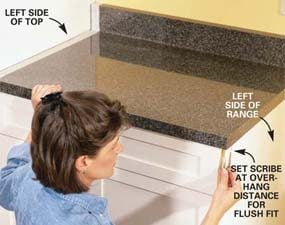
Photo 14: Scribe the overhang
Gear up your scribe to the overhang dimension. Use this setting to scribe the left side of the pinnacle for the return .
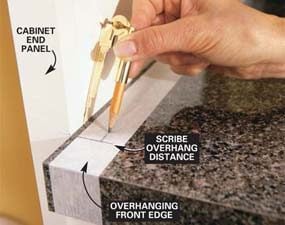
Photo 15: Mark the left side of the countertop
Scribe the left side of the top, then cut along your marker with a handsaw, leaving the front end edge to nestle around the stop panel and create a notch return.
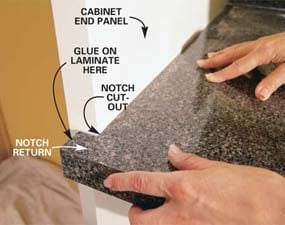
Photo 16: Test fit the countertop notch
Check the cut for fit and sand if necessary. Use contact agglutinative on the exposed notch border and on a small piece of laminate. One time the adhesive is dry to the touch, press the laminate slice in place and file the border for a clean, precise fit.
You may non accept to brand a "return" cut in your countertop like the one shown in Photos 14—16. If you do, follow the photo sequence. So cut and mucilage a small piece of laminate to the exposed border.
Although we made the countertop flush with the cabinet side (to adapt the range, Photo 14), you may take to adjust your scribe to allow for an overhang (Photo xv).
Use steel angles to anchor the top
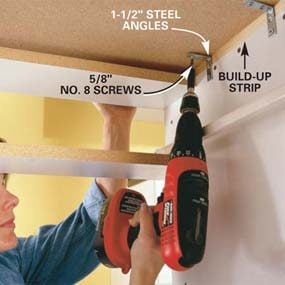
Photograph 17: Attach the countertops to the cabinets
Screw the countertop to the cabinet sides using 1-one/ii in. steel angles with 5/8-in. long No. 8 screws. For a tight fit, screw the angles to the cabinet first and then draw the top downwardly to see the steel angle with the 2nd screw.
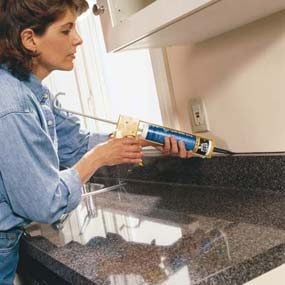
Photo 18: Caulk along the backsplash
Pull the colored silicone caulk tube nozzle in ane continuous motion forth the seam between the backsplash and the wall. Use simply plenty to fill the gap, then smoothen the dewdrop with a moist rag. Use a color-matched siliconized latex caulk for best results. It's paintable and cleans upwards with soap and water.
Professional installers vary profoundly in their methods of fastening countertops to base of operations cabinets. Some just glue them downwardly with construction adhesive, while others screw through the cabinet corner braces or sides into the top. Using one-one/2 in. steel angles like those shown in Photo 17 is foolproof and unproblematic.
You can buy them at any hardware store, but don't use the screws provided. Instead, buy 5/8-in. long No. 8 screws. I similar to place them a hair lower than the top of the cabinet (or build-up) and and then depict the top down tight with a screw into the underside of the countertop. Use as many angles as it takes to get a solid installation. Figure on using four every 3 ft.
Good Care Means No Harsh Cleaners
To get the most life from your new countertops, follow these uncomplicated rules:
- Never utilise the countertop as a cutting board.
- Never utilize bleach or abrasive cleaners. Instead, use products like Fantastic, Formula 409 or Pine-Sol practical with a soft cotton fiber fabric.
- Avert setting annihilation hotter than 140 degrees F. on your countertops. You could burn the laminate or suspension the glue bail below.
Required Tools for this premade countertops project
Take the necessary tools for this DIY project lined up before you start—y'all'll salvage time and frustration.
You'll besides demand a specialty tool: a laminate cutter
Required Materials for this premade countertops project
Avoid last-minute shopping trips by having all your materials ready ahead of time. Here's a list.
Originally Published: September 06, 2022

Source: https://www.familyhandyman.com/project/how-to-install-a-countertop/
Posted by: hopkinscooncers.blogspot.com
0 Response to "How To Install A Countertop Between Two Walls"
Post a Comment